Introduction
One of the most common questions I get asked is how do you add the Salesforce Mobile SDK for iOS to an existing project? Admitedly, it was pretty tricky with earlier versions of the Mobile SDK, but Mobile SDK 3.x makes it super easy. This tutorial will show you how to do it. The examples will be in Swift v2, but will work exactly the same for Objective-C, and earlier versions of Swift, minus the obvious syntax difference (and the addition of a briding header for Swift apps...but we will get to that shortly)
1.Install the Mobile SDK
If you don't already have the Salesforce Mobile SDK for iOS installed, go ahead and clone the Salesfore Mobile SDK for iOS from GitHub. Once you have the SDK on your local machine, do the following in a Terminal window
        cd [path-where-you-cloned-the-repo]/SalesforceMobileSDK-iOS
        ./install.sh
Once complete, you have the entire SDK, and dependencies. Check!
2.Add the Mobile SDK libraries to your project
The Mobile SDK supports CocoaPods for adding the required libraries to your project. From the command line, change directories to your project root.
pod 'SalesforceMobileSDK-iOS'
Then run:
$ pod install
        $ pod echo "pod 'SalesforceMobileSDK-iOS'" > Podfile
        $ pod install
Once completed, your Xcode project will have created a workspace file, and have the Mobile SDK libraries ready to go. From now on, use the *.xcworkspace file, and not the *.xcodeproj file.
3. Add the Bridging Header
The Mobile SDK is currently written in Objective-C. In order to access the libraries from Swift, we need to add a bridging header.- Create a new header (.h) file in the root of your project, and call it [projectname]-BridgingHeader.h (Avoid adding any spaces in the name. If you do, Xcode changes those to an underscore whenever you need to reference them in your app.)
- In your project build settings, search for Swift Compiler – Code Generation, and next to Objective-C Bridging Header add the name of the file you just created.
Now that you have your bridging header file created, add the following code:
        #import <SalesforceCommonUtils/SFLogger.h>
        #import <SalesforceSDKCore/SFUserAccountManager.h>
        #import <SalesforceSDKCore/SalesforceSDKManager.h>
        #import <SalesforceSDKCore/SFAuthenticationManager.h>
        #import <SalesforceSDKCore/SFPushNotificationManager.h>
        #import <SalesforceSDKCore/SFDefaultUserManagementViewController.h>
        #import <SalesforceRestAPI/SFRestAPI.h>
        #import <SalesforceRestAPI/SFRestAPISalesforceAction.h>
        #import <SalesforceRestAPI/SFRestAPI+Blocks.h>
        #import <SalesforceRestAPI/SFRestAPI+Files.h>
        #import <SalesforceOAuth/SFOAuthInfo.h>
4. Configure your AppDelegate
Now we have our project all configured, we need to update the AppDelgate to initialize the Mobile SDK.
        let RemoteAccessConsumerKey = "your-connected-app-consumer-key";
        let OAuthRedirectURI        = "your-connected-app-redirect-uri";
        let scopes = ["api"];
Then add the following code into your init method:
        SFLogger.setLogLevel(SFLogLevelDebug)

        SalesforceSDKManager.sharedManager().connectedAppId = RemoteAccessConsumerKey
        SalesforceSDKManager.sharedManager().connectedAppCallbackUri = OAuthRedirectURI
        SalesforceSDKManager.sharedManager().authScopes = scopes
        SalesforceSDKManager.sharedManager().postLaunchAction = {
            [unowned self] (launchActionList: SFSDKLaunchAction) in
            let launchActionString = SalesforceSDKManager.launchActionsStringRepresentation(launchActionList)
            self.log(SFLogLevelInfo, msg:"Post-launch: launch actions taken: \(launchActionString)");

        }
        SalesforceSDKManager.sharedManager().launchErrorAction = {
            [unowned self] (error: NSError?, launchActionList: SFSDKLaunchAction) in
            if let actualError = error {
                self.log(SFLogLevelError, msg:"Error during SDK launch: \(actualError.localizedDescription)")
            } else {
                self.log(SFLogLevelError, msg:"Unknown error during SDK launch.")
            }
        }
        SalesforceSDKManager.sharedManager().postLogoutAction = {
            [unowned self] in
            self.handleSdkManagerLogout()
        }
        SalesforceSDKManager.sharedManager().switchUserAction = {
            [unowned self] (fromUser: SFUserAccount?, toUser: SFUserAccount?) -> () in
            self.handleUserSwitch(fromUser, toUser: toUser)
        }

        func handleSdkManagerLogout()
        {
          //todo: add segues from each page to logout to send back to login view
          self.performSegueWithIdentifier("logout", sender: nil)
        }

        func handleUserSwitch(fromUser: SFUserAccount?, toUser: SFUserAccount?)
        {
          //todo
        }
5. Handle Salesforce Login
The last thing that we need to do is handle the salesforce login: display the login screen, and then accept the response. Most apps have some sort of welcome screen where a user can tap to login before being redirected to the app home. You probably have a storyboard that looks similar to mine below. When a user taps the connect to Salesforce button (on the ViewController labeled 1), we want to to perform the segue to Home (ViewController labeled 2).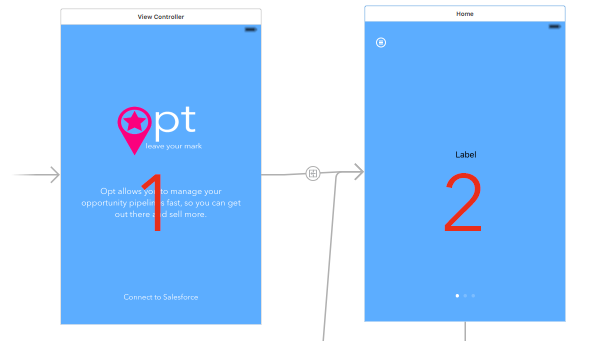 Within ViewController 1, and once you have wired up the appropriate outlets and actions to handle button taps, and added a seque to ViewController 2 (in my instance I gave it the identifier "loggedIn") add the following line of code to kick off the Salesforce authentication flow into your connectTapped function.
SalesforceSDKManager.sharedManager().launch()
Then, to handle to end of the authentication flow, specify that your View Controller is a delegate for the MobileSDK:
class MyViewController: UIViewController, SFAuthenticationManagerDelegate
and implement the Delegate's authManagerDidFinish function. I typically check if the username has been populated correctly. If it has, only then do I perform the segue to my HomeController.
SFAuthenticationManager.sharedManager().addDelegate(self)
    func authManagerDidFinish(manager: SFAuthenticationManager!, info: SFOAuthInfo!) {

     if !!SFAuthenticationManager.sharedManager().haveValidSession {
         //call the segue with the name you give it in the storyboard editor
         self.performSegueWithIdentifier("loggedIn", sender: nil)

         //or simply dismiss the login view to return to where you came from
         // self.dismissViewControllerAnimated(true, completion: {})
        }
    }